You are here: Teaching Helps > General Education > Teaching Math
Geometry to Touch
“Making Math Visible” was the title of Ruth’s first article. We are pleased to continue this two-part series, this time focusing on teaching geometrical concepts.
Does the word “geometry” remind you of memorizing theorems and proofs? Let’s start much younger with shapes children can actually see and handle. You can buy plastic shapes or cut them from cardboard, but I like to use thin linoleum scraps. Cut with heavy scissors to make quantities of shapes and sizes. They are durable and cost nothing but a little time.
It’s All in the Folding

Squares and circles are easy. If you want an equilateral triangle, start with a circle, fold in half, pinch the midpoint by folding again, but don’t crease to the circumference. Fold in thirds. Cut a straight line from edge to edge. Unfold! You now have one hexagon, two trapezoids, or six equilateral triangles. You can easily make these shapes any size you want by varying the size of the circle.
Make trapezoids and triangles in several colors and let the kids enjoy making their own tile designs. Add a few squares with the same length edge for more possibilities.
Future Engineers
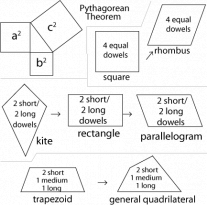
Small dowels of at least three different lengths can be joined with short bits of surgical tubing to demonstrate all the plane shapes. If you choose three–, four–, and five–inch units, you can have the pupils demonstrate the Pythagorean Theorem, a2 + b2 = c2.
Three dowels joined show the rigidity of triangles. Four equal sides can make a square, which moves to demonstrate a rhombus. Two long and two short dowels can make a kite or a rectangle, which can be moved into various parallelograms. One long, one medium, and two short dowels can also make a trapezoid. Three or more different lengths produce a general quadrilateral.
The flexibility of the vertices (points opposite the base of a figure) makes it easy to see a variety of figures in seconds and is much more fun than drawing with a ruler.
Regular (all sides the same length) and irregular pentagons, hexagons, heptagons, octagons, nonagons, decagons, and dodecagons are exciting possibilities. Most of these figures can also be made on the geoboard, but there the vertices remain stable.
Your Very Own Geoboard
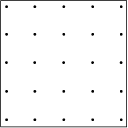
Geoboards are a fascinating way to explore shapes. My students made their own. We sanded wood, about 12 inches square (though they could have been a little smaller).
I made a few templates from tag board. Dots were arranged in five rows of five. They twisted pencils through the dots to make dots on their boards. Then they pounded round–headed brads through a piece of wood with a hole drilled in it. This kept the nails going in straight and kept them all the same height.
A generous handful of colored rubber bands made the designs. Children need time to experiment and show what they can make before settling in for a lesson. Ask for squares. How many different size squares can be made? How much area is in each figure if the smallest square is the unit of measure? Then ask similar questions about rectangles, parallelograms, trapezoids, and general quadrilaterals.
Try triangles—isosceles (two equal sides), scalene (no equal sides), right angle, and equilateral. Have children check the equilateral ones with a ruler. One side won’t be quite equal, but don’t tell! Let them discover it.
Suppose you want to teach that the area of a triangle equals the base times the height divided by 2. Let them discover this by enclosing any triangle in a rectangle with a different rubber band. Compare the amount of space in the triangle to the amount in the rectangle.
How many different size triangles can you make? Here you can teach the meaning of similar (same shape, different size), and congruent (same shape, same size). Talk about obtuse angles (more than 90°), and acute (less than 90°). Can a right triangle also be isosceles? Can it be scalene? Can it be equilateral?

Test this statement. The sum of the angles of a triangle is 180°. Give plenty of scrap paper. Cut all kinds of shapes and sizes of triangles. Put an arrow in the vertex of each angle. Now snip off the vertex of one triangle at a time. Line the three arrow points against a straight edge. True or not true?
The more formulas and theorems you can test visually, the quicker your students will learn them and the longer they will remember them. Remember, a picture is worth a thousand words!
Permission to copy but not for commercial use.